Pages

Friday, January 31, 2014

Vanilla Cupcakes with Lemon Buttercream Frosting

I love cupcakes. They are the perfect size and somehow this makes them taste so much better than regular cake. Today, I made some simple vanilla cupcakes and topped them with a fabulous lemon buttercream frosting. They were super simple to make and are perfect when you are craving that little bit of sweet.


Ingredients (Cupcakes):

  • 1 1/2 cups all-purpose flour
  • 1 tsp baking soda
  • 8 Tbls butter (softened) 
  • 1 cup sugar
  • 3 large eggs
  • 1 1/2 tsps pure vanilla extract
  • 3/4 cups almond milk
Directions (Cupcakes):
  1. Preheat the oven to 350 degrees F.
  2. Line cupcake pan with paper liners.
  3. In a medium bowl, mix together flour and baking soda. Set aside.
  4. In another bowl mix together butter and sugar until smooth.
  5. Add eggs one at a time. Beat in vanilla.
  6. Add flour mixture and milk. Alternate each and add slowly.
  7. Fill liners evenly with mixture until they are all about 3/4 full.
  8. Bake for 20 minutes rotating half-way through.
  9. Let cool thoroughly before frosting.


Ingredients (Frosting):
  • 3/4 cup butter (softened)
  • 1 tsp grated lemon peel
  • 1 1/2 Tbls lemon juice
  • 1 1/2 cups powdered sugar
  • 1/2 Tbls almond milk
  • 1/2 Tbls vanilla
Directions (Frosting):
  1. Beat butter, lemon peel, and lemon juice until smooth and creamy. 
  2. Add in milk and vanilla.
  3. Gradually beat in powdered sugar until light and fluffy.
  4. Frost your cooled cupcakes


These cupcakes were so good! They took almost no time at all and were super easy to make.

Linking Up To:
Time Travel Thursday
What We Eat Wednesday

Tuesday, January 28, 2014

Simple Banana Bread


Lately, I have been trying to buy more fruits and veggies to incorporate into my diet. I figure if I buy them, I will eat them, and for the most part I have. Unfortunately, I overestimated how many bananas I could eat this week and ended up with some over-ripe fruit. Naturally, the only solution is to make banana bread! Who doesn't love some soft, warm banana bread straight from the oven? Plus, there's no sense letting good bananas go to waist. So here is my simple, go-to recipe when I decide to make some delicious banana bread.

Too ripe to eat but perfect for banana bread!

Ingredients:

  • 3 bananas, mashed
  • 1/2 cup Earth Balance butter, melted
  • 1 cup sugar
  • 1 tsp vanilla
  • 1 tsp baking soda
  • 1/2 tsp cinnamon
  • 1 1/2 cups flour
Directions:
  1. Preheat oven to 350 degrees F.
  2. Mash the bananas and mix them with your melted butter.
  3. Add sugar, vanilla, baking soda, and cinnamon. Mix well.
  4. Add flour slowly. Mix completely.
  5. Pour into 5x9 loaf pan.
  6. Bake for 1 hour or until inserting toothpick comes out clean and top is brown.

This is one of my favorite breads to make because it is so quick and simple. Hope you all enjoy this recipe as much as I do!

Friday, January 24, 2014

Cheesy Paprika Chicken and Rice

Tonight's dinner was simple and easy to make... two of my essential qualities when it comes to a good meal.


Ingredients:


  • 2 chicken breast halves
  • 1/4 cup all purpose flour
  • 1/2 cup shredded Daiya cheddar cheese
  • 2 teaspoons paprika
  • 1/4 teaspoon garlic salt
  • 1/4 teaspoon salt
  • 1/2 teaspoon pepper
  • 1 egg
  • 2 tablespoons almond milk
  • 1/4 cup dairy-free butter, melted
  • 1 box chicken flavored rice
  • 2 cups water

Directions:
  1. Preheat oven to 350 degrees F. 
  2. Mix water and rice together and pour into bottom of casserole dish. Set aside.
  3. Combine flour, paprika, garlic salt, salt, and pepper in a medium bowl. In another bowl whisk egg and milk together.
  4. Dredge each chicken breast in the egg mixture and then the dry mixture. Make sure the chicken is covered completely. Place in casserole dish on top of rice. 
  5. Cover dish with foil and cook for 1 hour. With 15 minutes left, uncover and stir rice mixture. Leave uncovered for rest of cooking time to allow crust to become crispy.
  6. Remove from oven and serve with a side of cooked vegetables or a baked potato.

This meal was very good. The chicken was nice and crispy on the outside and had some really good flavor. I could not even tell it was dairy-free.

Thursday, January 23, 2014

DIY Knob Coat Hanger


I have been wanting a more defined entryway lately and I finally decided that the perfect way to do this was with a new coat hanger. I did not want a generic one and I felt the only way to get what I truly wanted was to make it myself. I did some searching online and got a lot of inspiration for my own project. It took me very little time and can be customized to fit anyone's style.
Finished entryway
Supplies:
  • board
  • paint color of choice
  • 5 knobs - I got mine from hobby lobby
  • hack saw
  • 3 small D-ring hangers
  • 3 small screws - smaller than width of your board (if the screws that come with D-ring hangers are too long)
  • 3 drywall anchors with screws
  • Drill
  • Drill bits
Directions:
  1. First step is to take the board you chose for the base of your coat hanger and paint it. You only need to paint the front and sides.
  2. Next, turn the board over, mark where you want the knobs to go, and pre-drill the holes. I started by marking the middle one first and then the others. That way everything would look symmetrical.
  3. Once the holes are drilled, screw in each knob.
  4. Since I used knobs from hobby lobby, the screws attached to the knobs were too long and stuck out in the back. To fix this, I took a hack saw and cut off the extra part of the screw. I did this while they were screwed into the board. Be careful though because the hack saw makes the ends of the screws a bit jagged and hot. Make sure not to cut or burn yourself.
  5. Next, attach three small D-ring hangers onto the back of your coat hanger. You can use more or less, depending on how long your coat hanger is. I had to buy extra screws to do this because the screws that came with the D-ring package were too long for the board. If your board is thicker you won't need to do this.
  6. If you are drilling into studs you will not need the drywall anchors. If you are drilling right into drywall use the anchors to hold the screws in the wall. Hang your beautiful, brand-new coat hanger on the screws!
The hardest part of this project was hanging it on the wall. There are many different options on how you can do this but I decided on the D-rings because I thought they would be able to hold more weight. To make more of a statement I put a floating shelf above it and added some decorations. I used things I found around the apartment to put on the shelf, making that part almost free. I hope you all find some creative ways to make your own unique knob coat hanger!


Closeup of the finished project.
Wooden letters to represent me and my boyfriend's initials.
Some decorations for the shelf.
Linking Up To:

Sunday, January 19, 2014

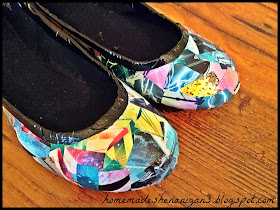
Mod Podge Flats

One trend I have seen in various places is using mod podge on shoes. A project that really caught my eye was comic book shoes. I have seen several people's take on that idea and I decided to try it out myself. I originally wanted to do it on a pair of high heels but the shoes I ended up finding for cheap were some flats from Walmart. Lately, I have really gotten into comic books (a habit I picked up from my boyfriend) and I tend to frequent the dollar comic book bins. I picked up some Avengers comics for a dollar a piece intending to decorate a comic book bin for my boyfriend about a month ago. I had not gotten around to it yet and decided to use them on my new pair of bargain shoes instead. After getting halfway through the project, I decided to not put any of the obvious comic book cutouts on the shoes (ex: word bubbles, characters, etc.). The colors I chose to do the background of the shoes in would have clashed too much with the character cutouts and I was way too happy with how they looked without the extra pieces! So instead of being comic book shoes, they turned into some fun mod podge shoes.


 Supplies:
  • Comic books or other colorful paper items (you could use scrapbook paper or magazines) - $5.00
  • Mod Podge - Free
  • Shoes - $6.00
  • Foam brush - Free
  • Black, skinny duct tape - $3.00
All the supplies before I began the project.
Directions:
  1. First, cut out various geometrical shapes out of your paper item. Cut out some thin rectangles for the edges and some other random shapes for the middle. The thin pieces will help get a cleaner line along the edges.
  2. Next, put mod podge on the shoe and place the paper shapes in a random pattern on the shoe. It is easiest if you do the edges first and then fill in the middle. I learned this after I had already started. I will make sure to do this with the next pair I make. 
  3. As you lay the pieces down, mod podge over them to make them smooth and stick on better. The glue over top the image looks milky. Don't worry, this will dry clear and your image will look great. 
  4. Let the shoes dry overnight. 
  5. Next, take your duct tape and put it along the edge of your shoes.Make sure it folds over into the inside of the shoe. This will help line the top of the shoe to give it a clean line.
  6. Press down on the tape to make sure it sticks well and they are ready to wear! If you are worried about the image getting worn off, put some extra coats of mod podge on the shoes. Make sure to let each coat dry completely before adding the next.


Total Cost:  $14.00

Even though I did not use the comic book characters on these shoes I made sure to keep them because I had already cut them all out. Those parts were what took the longest so I definitely did not want to waste them. These shoes took a very long time to make but it was worth it. I really love how these shoes turned out and I cannot wait for the weather to warm up so I can wear them out!


Friday, January 17, 2014

Simple Dairy Free Mashed Potatoes with Gravy

So last night I decided to surprise my boyfriend with a nice home cooked meal. One of my favorite comfort foods is mashed potatoes with gravy. Most mashed potato recipes contain a lot of milk and other dairy products but luckily it is very easy to convert to dairy-free!

Fried pork chops with mashed potatoes and gravy.

All of the ingredients used to make the potatoes.


Ingredients (Mashed Potatoes):
  • 6 potatoes
  • 4 Tbls butter - Earth Balance is a good dairy-free option
  • 1cup almond milk
  • salt
  • pepper
  • garlic salt
Directions (Mashed Potatoes):
Potatoes washed and ready to peel.
  1. Wash and peel your potatoes. Make sure to cut off any dark spots you see.
  2. Cut potatoes into equal pieces and boil over medium-high heat for about 15 minutes or until they are soft.
  3. Drain potatoes in a strainer and place them in a bowl with the softened butter.
  4. Mash potatoes and butter together. Slowly add almond milk. You may add more milk if mixture seems too dry. Mash until you get the consistency you want.
  5. Season with salt, pepper and/or garlic salt. I waited to do this until after they were served. My boyfriend likes his potatoes plain and I like them garlicky.
Ingredients (Gravy):
  • 2-4 Tbls pan drippings
  • 2 Tbls flour
  • 1 cup Almond milk
Directions (Gravy):
  1. Remove 2-4 Tbls pan drippings and place in saucepan.
  2. Add flour and whisk continuously until mixture thickens.
  3. Stir in almond milk. May add more if mixture too thick.
This meal was very delicious and the potatoes were so easy to make. Usually, I think of mashed potatoes as very time-consuming but this took almost no time at all. My main dish was fried pork-chops so I used the pan drippings from that. If you do not have pan drippings to use, broth can be substituted. 

One thing that some people do not know is that while butter is dairy, it has very little lactose due to how it is made. Many people who are lactose intolerant can tolerate regular butter. Some people will use margarine instead but many times it too will have lactose in it. If you want to be strictly dairy-free, Earth Balance has some good vegan products. Butter was one of the last diary items for me to cut out and after going completely dairy free I feel amazing!

Monday, January 13, 2014

Stenciled Strength Pillow

After completing my other two pillows Drop Cloth Flower Pillow and Painted Love Pillow, I began work on a project inspired by Wit and Whistle. Her pillow with a quote stenciled on it was a brilliant idea. I decided that I did not want a quote but rather a word. I chose "strength" because it was a word you don't normally see on things and since I was moving to a new city and starting a new job, I thought it was fitting. I had already done a "Love" pillow so I thought a way to make it more unique would be to add more words. I did this by looking up strength in many different languages. I decided the translations would be the background and the English version would be the focal point.


Materials: 
  • 1/2 yard of drop cloth: Free
  • Paint: Free
  • Thread: Free
  • Paint brush: Free
  • Martha Stewart trace your own tracing paper: Free
  • Craft knife: Free
Directions: 
  1. Cut out three pieces from the drop cloth. One 19" x 21", one 19" x 17", and one 19" x 14".
  2. Make a word document with the image/words you want on your pillow. 
  3. Print it out. You may need to print it onto several pieces and then tape them together in order to be big enough for the pillow.
  4. Tape the pages onto the tracing paper and cut out the letters/image with the craft knife. 
  5. Once it is all cut out, take the backing off and place firmly onto the largest piece of drop cloth.
  6. Paint the pillow. I used leftover black house paint Peal off the stencil once dry.
  7. Assemble pillow based on picture bellow:

Total Cost: Free

Cost for all three pillows: $30.00

The pillow turned out very nice. All three pillows that I made from the drop cloth are now being displayed in the guest bedroom. They fit perfectly with the decor and really finish off the room. They aren't the most comfortable pillows to lay on but they work perfectly for decoration.


Drop Cloth Flower Pillow

If you haven't noticed by now, much of my inspiration comes from things I see on Pinterest. Last year when I was preparing to move to my very own apartment after graduating college, I decided to do a few DIY projects that could be used for decorations. Cluck Cluck Sew has a great tutorial and I love the pillow she made. This is where I got the idea for this project. However, I wanted to switch it up and use a more unconventional fabric so I decided on using a canvas drop cloth. It was cheap, durable, and had an interesting look. For the flower petals I used red felt. This fabric is a bit stiffer so it will better hold its shape, plus I had some leftover from a past project making it free.


Supplies: 
  • 1/4 yard felt: Free
  • 5ft x 4ft canvas drop cloth $6.00
  • 18" x 18" pillow form: $5.00
  • Scissors: Free
  • Thread: Free
Directions:
  1. First, you need to cut out the main pieces of the pillow. To do this cut three different sized rectangles from your drop cloth: one 19" x 19", one 19" x 15", and one 19" x 12". Next, cut out your petals by cutting your felt into 30 large circles (3in) and 20 small circles (2in). Then cut each of those circles in half.
  2. Take the largest piece of your drop cloth, this will be the front of the pillow where the petals will be sewed on. Draw a large circle on it, leaving about 5 inches around the edge. This will be your starting guide for the petals.
  3.  Line up the edge of the petals along the line and sew them in place as you go. Once you are about to meet up with the first petal you placed, start overlapping and work your way to the center in a spiral fashion. Once you get closer to the center, begin using the smaller sized petals.
  4. At the very end, cut out a small circle and sew it in the middle of your flower. 
  5. Next, you need to finish the pillow. In order to do this take the remaining two pieces of drop cloth and sew them to the piece with your flower on it to make a simple envelope pillow. Cluck Cluck Sew does a much better job explaining this entire process than I do and even has some great pictures.
Total Cost: $11.00

I was really happy with how my pillow turned out and I ended up making three different pillows using the drop cloth. To view those see Painted Love Pillow and Stenciled Strength Pillow.


Painted Love Pillow


This is the second pillow I made using the drop cloth I had purchased for my Drop Cloth Flower Pillow. I got the idea from Crazy Wonderful. Her's turned out so beautifully that I had to make one for myself. Mine ended up being only one sided though and I used the envelope style to close the pillow, instead of sewing it shut.


Supplies:

  • 1/2 yard of drop cloth: Free
  • Thread: Free
  • Paint: $2.00
  • Small paint brush: Free
  • 6" x 14" pillow form: $6.00
  • Martha Stewart trace your own adhesive tracing paper: $11.00
  • Craft knife: Free
  • Cutting mat: Free

Directions:
  1. First, cut out three pieces from the drop cloth. You will need one 11" x 21", one 11" x 17", and one 11" x 14". 
  2. Take the largest piece and place on a mat or piece of cardboard. This will be the part that is painted and you don't want the paint to bleed through onto a nice surface.
  3. Print out a word or phrase you want to use and trace it onto your tracing paper. Cut it out with your craft knife. Take off the backing and press it firmly onto the drop cloth.
  4. Paint your pillow.
  5. Peal off the stencil once dry.
  6. Sew the pieces together envelope style. Like the picture shows bellow. Flip inside out and place your pillow form inside.

Total Cost: $19.00

This was a simple pillow to make. It has looked great on my couch, on my chair, and on the guest bed. I will probably try making another one again soon.

Sunday, January 12, 2014

Cheesy Chicken Crescent Roll Casserole

This recipe has been a favorite of mine for a while. After finding out I was lactose intolerant I worried that many of my past favorite meals would no longer be an option for me. This recipe I found at Tastebook has been a favorite of mine. The original contains lots of dairy products however so I needed to modify it for my diet. Luckily, there has been a big increase in vegan friendly foods, including vegan cheese (no dairy) which helps me make this recipe stomach friendly for me!


The cheese I used was Daiya cheddar and Daiya mozzarella. I have also used GO Veggie! cheddar cheese which was really good; however, some of their cheese is only lactose free not dairy free so vegans should make sure to read the label before buying. The sauce also asks for table cream and I have found that mayonnaise is a good substitute for this if it is being put in savory foods. 

  • Dairy-free cheese has been the most difficult part of my diet change. It definitely does not taste like cheese to me but it is still good. I still have not been able to eat it plain on a cracker but it is good cooked in meals.

Sauce:

  • 2 cups (or one can) cream of chicken soup, undiluted - My Wise Mom has a great dairy-free recipe
  • 3/4 cup grated cheddar cheese
  • 1/2 cup mayonnaise
  • 1/4 teaspoon ground pepper (or to taste)

  • Filling:
  • 2 (8 ounce) cans crescent rolls
  • 4 ounces cream cheese (softened)
  • 4 tablespoons butter (softened) - EarthBalance is a good dairy-free option
  • 1/2 teaspoon garlic powder
  • 1/4 teaspoon onion powder
  • 1/4 teaspoon seasoning salt
  • 2 (10 ounce) cans cooked chicken or 2 cups cooked, shredded chicken
  • 1/2 cup grated cheddar cheese
  • 1/4 cup grated mozzarella cheese
  • 2-4 tablespoons mayonnaise


  • Toppings:
  • 1-2 cup grated cheddar cheese (optional - I did not use this)
  • 1/4 teaspoon parsley


Directions:


    1. Preheat oven to 350°F. Butter a casserole dish (I used a 9x13 pan but any size will do).
    2. In a medium saucepan, mix mayonnaise, cheese, and cream of chicken soup on medium heat until smooth. May season with pepper to taste. Do not boil. Remove from heat.
    3. Mix the cream cheese and butter until smooth. Stir in garlic powder, onion powder, and seasoned salt. 
    4. Add chicken, shredded cheeses, and mayonnaise. May add more mayonnaise if mixture seems too dry.
    5. Place one spoonful into each crescent triangle. Roll up and place in the pan, preferably seam side down. This doesn't need to be perfect. It will be messy. Some filling will end up spilling out of the side and that is okay.
    6. Pour the sauce evenly over the tops of the crescent rolls. Garnish with grated cheese if desired and sprinkle the parsley on top.
    7. Bake for 30-40 minutes or until tops are golden brown.


    The finished meal still in the pan, fresh from the oven!
    Laid out on my plate, ready to eat.

    I made this last night for me and my boyfriend (who is not on a diary-free diet) and it got his approval so I think this will work whether you eat dairy or not. I vary the recipe up every time I make it by using different cheeses and it is good every time. Maybe next time I will try to add some veggies. If you try this make sure to let me know what you think!

    Linking Up To:

    Friday, January 10, 2014

    Superhero Plates

    Last year for my boyfriend's birthday I decided to surprise him with a one-of-a-kind gift. He is a huge fan of comic books, specifically Marvel comic books. I wanted to make him something that related to this obsession of his and after brainstorming for a while I came up with a brilliant plan. Superhero plates. Now, one of the projects I have been eyeing on Pinterest for a while is the one involving using sharpie on a plate and then cooking it.After searching online and looking at many different drawings of Marvel superheros I settled upon four: Miss Marvel, Thor, Iron Man, and Sentry. I picked out a couple drawings of each and used those for inspirations. I am not very good at drawing from my head but if I see a picture I can usually copy it and alter it to my liking. The most difficult one for me to draw was Sentry. I originally was going to add some color to the plates but was so happy with the original I decided to keep them black and white. 


    I found the plates at the dollar tree. After purchasing them I washed each plate and let them dry. I printed out some various drawings of each character that I found online to use as reference. I then traced the outline for each character. After that I went in with all the detail and finished off with the border. I did one plate at a time and let them dry before putting them in the oven. I cooked them for 20 minutes at 400 degrees Fahrenheit. I let them cool overnight and they were done!

    Materials:


    • Plates: $1.00 each
    • Sharpies: Free

    Total: $4.00


    Overall, this was an inexpensive project that turned out to be very successful. Chris ended up really liking how they turned out and is refusing to eat off of them. I do not know how they will hold up when washing them. We are going to hang them up and use them as decoration. Each plate took around 6 hours to make so if you are looking for a quick project I would recommend using a simpler design.

    Linking Up To:
    Link Party Palooza

    Thursday, January 9, 2014

    Mail Organizer

    One problem I seem to have developed is a lack of organization when it comes to my mail. It usually just ends up laying on the counter causing all my bills to get mixed up with everything else. Unfortunately, I do not have enough wall or counter space to make a full "mail station" like some of those I have seen on other blogs or Pinterest. What I needed was something small that would hold all my essential mail. During one of my trips to the grocery I found a plastic mail holder in the office section. It was a simple grey and had a magnet on the back. I had a good space on the side of my fridge that would fit the holder perfectly. The only problem is that it was too plain and looked really cheep. I bought some sparkly take and some decorative burlap flowers to decorate it. This is what I came up with:


    The mail holder was just the right size to fit on the side of my fridge. Now I can put all my bills and letters that need attention there and they won't get mixed in with everything else. Maybe someday I will have more wall space to have a true command center but for now this works for my needs.


    Materials:
    • Mail holder: $4.00
    • Sparkle tape: $10.00
    • Flower: $5.00
    • Label maker: Free
    Total: $19.00

    I made this mail organizer about a month ago so the prices are estimates. Also, the sparkle tape was a pack of twelve containing six different colors so I will be able to use the remaining for future projects. The flower came in a pack of two but I decided to only use one. Overall, I think it turned out well and I am happy with how much it cost.

    Wednesday, January 8, 2014

    Microwave Cart Makeover

    I have been wanting to try out chalk paint for quite a while now and after visiting my parents for the holiday I found the perfect opportunity. My mom had been wanting to redo a large credenza she had in the family room (now converted billiards room) but did not know how it would be possible since it was too heavy to move outside and sand. Chalk paint presented the perfect option since no sanding is required. We would not have to worry about getting dust throughout the house and wouldn't have to come up with a means of getting it outside. Since I had never used chalk paint before I decided to try it on a smaller piece of furniture, a microwave cart. This had been laying around the house collecting dust and was in desperate need of a makeover. 

    I forgot to take a picture before I started setting everything up. I had already removed the doors for easier painting and had placed a flexible work light so I could see where I was painting.

    This is what the doors looked like before with the original handles. This is the back of the door with the handle just sitting on top so the black hardware won't be visible when the doors are reattached.

    Now anyone who knows me knows that I like completing my projects in the easiest and cheapest way possible while still getting professional results. You may even say I am a bit of a penny pincher. So while there are some chalk paint distributors close to where I live, I was not liking the prices nor the limited choices on colors. I decided to do some research online and found a good recipe for homemade chalk paint. I found the blog How to Distress Furniture which compared three different chalk paint recipes. I thought they did a wonderful job showing the differences between the various types. The one I went with used Plaster of Paris: 

    • 1 cup latex paint 
    • 2 1/2 Tbls Plaster of Paris 
    • 1 1/2 Tbls cool water


    I did not want to use my measuring tools that I use for food so I just estimated amounts which worked pretty well for me. The paint mixed up really well and went on smoothly. One 10 oz sample size of paint from Lowe's was enough to do three coats. I let the paint dry overnight and then applied a coat of Minwax finishing wax. After a new set of handles the microwave cart looked brand new. It was a drastic improvement and will fit perfectly in my mom's home office for additional storage space.

    I decided to use a brighter color since it was a smaller piece of furniture. There is also some distressing on the edges that are difficult to see in this picture. I am hoping to add some baskets or bins in the open space for organizing papers.

    Materials:

    • Microwave cart: Free
    • 4 lb box Plaster of Paris: $6.50
    • 4 oz sample paint: $4.00
    • 2 bronze handles: $8.00
    • Minwax Finishing Wax: $9.00
    • Paint brush: Free
    • Scrap rags (for applying wax): Free
    • Water: Free


    Total: $27.50


    Overall, I love how the cart turned out. This makeover cost less than $30 which is a steal, especially since almost all of the items can be reused. I barely touched the Plaster of Paris and Minwax finishing wax. I cannot wait to paint more things with this paint recipe. Next up will be that credenza!