Pages

Friday, May 23, 2014

Love You Forever Artwork + Free Printable

My cousin had her baby shower this weekend and it was a lot of fun. The food was great and we all cannot wait until her baby has arrived! I was in charge of picking out the gift and while I got several things on her registry I also wanted to do something unique just for her.


As part of her registry she mentioned that the nursery is going to be decorated in an owl theme. I later found out that the reason she chose this is because the first appointment where she heard the baby's heartbeat the office recorded it and put it in a stuffed owl. I thought that was really sweet. I decided to make her some artwork that could go into the new nursery.


One of my favorite books growing up was Love You Forever by Robert Munsch. This book is about a mother and her baby. She sings to him every night and the book shows the progression of the baby growing up. My mom cannot read the book without tearing up. The song the mother sings was the quote I decided to use for the artwork:

"I'll love you forever. I'll like you for always.
As long as I'm living. My baby you'll be."

Since my cousin was doing an owl theme with blue, yellow, and grey I decided to incorporate that into the artwork. Also, at the party we all got these amazing necklaces as party favors. My aunt sells jewelry and this necklace is very versatile. As you can see below, the owl charm can be taken off and replaced with another charm to fit any occasion. Visit her Facebook page Glammy Girls to see more!

Go check out Glammy Girls!


I had so much fun making this artwork and going to the baby shower. My cousin seemed to really like it and her husband said he already knows where he wants to put it in the nursery. I cannot wait to see what their nursery looks like :) Hope you all enjoy and I am putting a link down bellow so you can make your very own Love You Forever artwork!


Tuesday, May 20, 2014

Mini Meat Lover's Quiche

I love breakfast food and for me, quiche, is a perfect way to get breakfast during any part of the day. This was one of the recipes I made for my freezer cooking and it was delicious. I made them into mini quiches so that I could heat one up at a time and not worry about having a lot of leftovers. I had made this quiche before with a pre-made crust but this time I wanted to make everything from scratch. I found a crust recipe in my Joy of Cooking cookbook, made the filling, and froze it for a rainy day.


Ingredients Crust:

  • 2 1/4 cups all-purpose flour
  • 1 1/4 tsp salt
  • 3/4 cup dairy-free butter
  • 6 Tbls ice water

Ingredients Filling:
  • 4 eggs
  • 1 cup almond milk
  • 1/4 tsp dried mustard
  • 1/4 tsp paprika
  • 1/8 tsp ground nutmeg
  • 3 smoked sausages, cooked and diced
  • 5 pieces bacon, cooked and diced
  • 1 Roma tomato, diced
  • 1 cup dairy-free mozzarella cheese
  • 1 cup dairy-free cheddar cheese
  • pinch of salt
  • 1/8 tsp pepper
Directions:
  1. To make the crust, combine flour and salt in medium bowl.
  2. Add butter and cut into flour mixture with fingers until dough is in pea-sized pieces.
  3. Sprinkle dough with ice water and gently blend until dough just holds firm. 
  4. Press dough into pie pan or quiche pan (I used mini foil pie pans).
  5. Next, make the filling by whisking eggs and almond milk together.
  6. Add seasonings and whisk until combined.
  7. Add meat, tomatoes and most of the cheese.
  8. Pour mixture into pie pan and sprinkle top with remaining cheese.
  9. Either place in freezer for later use or cook in oven for about 1 hour at 375 degrees Fahrenheit.

This recipe as always turned out delicious. The cook time is about the same whether you make one big pie or three smaller ones. This is because the three small ones I made were deeper than if I made the one big one. Either cook it right away or freeze for later, both ways turn out amazing. Feel free to experiment with your quiche. Add some ham to make it a true meat lover's delight or switch up the types of cheese. I think I make it a little different every time. Enjoy!

Sunday, May 18, 2014

Mother's Day Chalkboard Print + Free Download

Life has been very busy for me the last couple of weeks. My brother graduated from college last weekend, we celebrated mothers day at the same time, and this weekend I am heading to Chicago for a baby shower. In order to make this mothers day special I wanted to make my mom her own unique piece of artwork.


After doing some searching, I found inspiration at Dear Lillie with her framed chalkboard printout and decided I really wanted to make my own. She has several different prints that look amazing and you should definitely check them out but I wanted to make my own custom print. I found a quote that I really liked by Stephanie Precourt:

"There will be so many times that you feel like you've failed. 
But in the eyes, heart and mind of your child you are super mom."

When I originally started laying everything out I actually wrote the quote down wrong. I wrote "you are a superhero" instead of "you are super mom". It worked out though because I love superheros! I decided to keep the superhero part since to me my mom is the ultimate superhero.

To make the chalkboard print I used Microsoft Publisher. It took a while but I love how it turned out. The fonts I used were:

I found all of the fonts here for free. The flower came from the font "KG Flavor And Frames Six". It is a font made up of pictures that look like they were drawn with chalk. 


Once your design is complete have it printed as an engineering print at Staples. This way cost me only $3.00 for a 24x36" print. Other places were going to charge me $30+ for a poster print and it was going to be glossy instead of matte which would not be good for a chalkboard look.

So now lets get to what you will need and the steps you need to take to make your own frame! Dear Lillie does an amazing job explaining how to build your own frame. I basically followed the same principal but made a few small changes.

Materials:
  • (2) 1x3x8 pine boards cut to size
  • Stain
  • Drill
  • 1 1/4" pocket screws
  • Kreg Jig
  • 24"x36" chalkboard print
  • Black tape
  • 24"x36" plywood
  • (2) D-Ring hangers
  • 3/4" screws
  • 1/2" screws
Directions:
  1. First, cut your wood boards to size. I used 1x3 pine boards from Lowe's and had them cut down for me. The one I go to does unlimited cuts and they have always been great about it. I cut my pieces to 28" and 33". These were the lengths Dear Lillie recommended but I did not think about the fact that she used 1x4's and I used 1x3's. If I could go back and change anything I would have cut my boards to be 26" and 33" instead.
  2. Next, use your kreg jig and pocket hole screws to combine the pieces together to make your frame.
  3. After you have the basic frame finish it with your choice of stain or paint. I used Rustoleum Walnut.
  4. Coat with polyurethane. I did three coats and sanded in between each.
  5. Tape your chalkboard print onto the piece of plywood.
  6. Flip your frame over and screw the plywood into the back of the frame.
  7. Finally, screw your d-ring hangers into the back of the frame. One on each side about halfway down. All done!

This was a pretty simple project to make. The print took the longest to make and the frame was super easy. I think I may make some of these frames for my own apartment! Let me know what you think about this project!

Sunday, May 11, 2014

Bridal Shower Invites

My summer is going to be full of weddings! My brother and two of my cousins are getting married. It is a very busy and exciting time for them! One of the projects that I have been put in charge of is planning the bridal shower for my future sister-in-law. It has been a lot of work but also a lot of fun. Pinterest has definitely come in handy for lots of inspiration!


First step in the planning process was coming up with a theme. My future sister-in-law is using pink as one of her main colors and she loves Disney princesses. I decided to go with a pretty in pink theme with a touch of elegance. The first thing I designed for the party was of course the invitations. These took a long time to do but I wanted something unique. Lately, I have seen a lot of artwork and party invites using a mismatch of fonts... which I LOVE! I had to use that idea when making my own invitations... I just had too :).
Here are the steps I took to make these but I am also going to include a template at the bottom of the page so you can just use that if you don't have the time or patience to come up with your own.

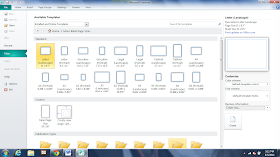
STEP 1: Open Microsoft Publisher. There are other programs out there you can use but this is what I had on hand and it worked great. 

STEP 2: Create a new document. There are lots of templates you can choose from. The size template I used was 4" x 6". This was a custom size:

Go to "New" and then select "More Blank Page Sizes" at the top.
Under the "Custom" section select "Create new page size..."
This is where you can customize the size you want.
STEP 3: Use various clip art found in the program to create a border. I made a dotted line square then laid the artwork over top to make it interesting.

STEP 4: Determine your wording layout and what types of fonts you want to use. I recommend only using 4-5 fonts and repeating them. Too many fonts will make the invite look overly busy. 

STEP 5: Print the invites onto card stock of your choice and cut them out using a straight cutter or send them to a specialty store to be printed. I chose to have Fed Ex print mine. I saved the file onto a flash drive, brought it to the store, and they were able to size it, print it, and cut it all right there. It took very little time and only cost less than $20 for the invites and the envelopes.

This project took a lot of time but saved me a lot of money. The cards were unique and turned out exactly the way I wanted them too. The bride to be also very excited to see it come in the mail. Hope you all enjoy and here is the file!

Bridal Shower Invites - Microsoft Publisher Document
Bridal Shower Invites - PDF Document

Monday, May 5, 2014

Flower Artwork


After looking online and at many stores in the area for artwork I realized that nothing I found fit the idea I had in my head for my dining room. I wanted something big and fun that would match the colors found throughout my apartment. I realized that the only way I was going to get exactly what I wanted was to make it myself.


After looking all over Pinterest I came up with a couple of ideas. My favorite was the flower made from various scraps of paper. I went immediately to my local craft store and picked up some coordinating scrapbook pages. I wanted yellows, reds, and blues since those are the colors I had used in my living room. I was originally going to get some canvases for the base of the artwork but there were some foam boards on sale so I decided to try those. I grabbed a couple and got to work.

Supplies:
  • Foam board
  • Coordinating scrapbook paper
  • Glue stick
  • Scissors
I was originally going to use mod podge to attach all of the petals but it made the surface look strange so I ended up using a glue stick instead.
Directions:
  1. Cut petal shapes out of your scrapbook paper. I made a template out of some scrap cardboard and traced it to make sure all my cutouts were the same size and shape. 
  2. Cut out a circle from one of your pages. This will be the center of your flower.
  3. Lay your cutouts on the foam board in the pattern you want. Once you get it the way you want take your glue stick and slowly glue the shapes onto your foam board. I originally thought of using mod podge but it made the foam board get an uneven sheen to it.

The most tedious part of this project was laying all the shapes out to get the right pattern. What's great about this artwork is that you can customize it to any color scheme and it is super simple to do. If I can do it so can you. Another idea for a layout would be to do several smaller flower shapes instead of just one big one. Hope you all enjoy!