Showing posts with label Furniture Revamps. Show all posts

Tuesday, July 8, 2014

Superhero Desk Chair

My boyfriend has a serious obsession with superheros and Marvel comics is displayed everywhere in his office. Artwork he finds at comic cons line the walls and he has a fairly large collection of superhero figurines. One of his degrees is in film and he proudly shows this anywhere he can.


One thing his office was lacking was a nice office chair. I debated getting him a big leather one but when I had the opportunity to inherit an old office chair from my Granny's house I took it and decided to give him something more unique. Here is how I did it:

Supplies:
  • Office chair of choice
  • 3 yards Marvel fabric
  • 1 yard black fabric
  • Staple gun
  • Sewing machine
  • Seam ripper
  • Staple remover
  • Pliers
  • Screwdriver
  • Black paint
  • Polyurethane
  • Plaster of Paris
Directions:
  1. First, you will need to disassemble the chair. Unscrew the arms and set aside. Also, unscrew the bottom rolling portion. You should now have two separate cushions (the back portion and the part you sit on).
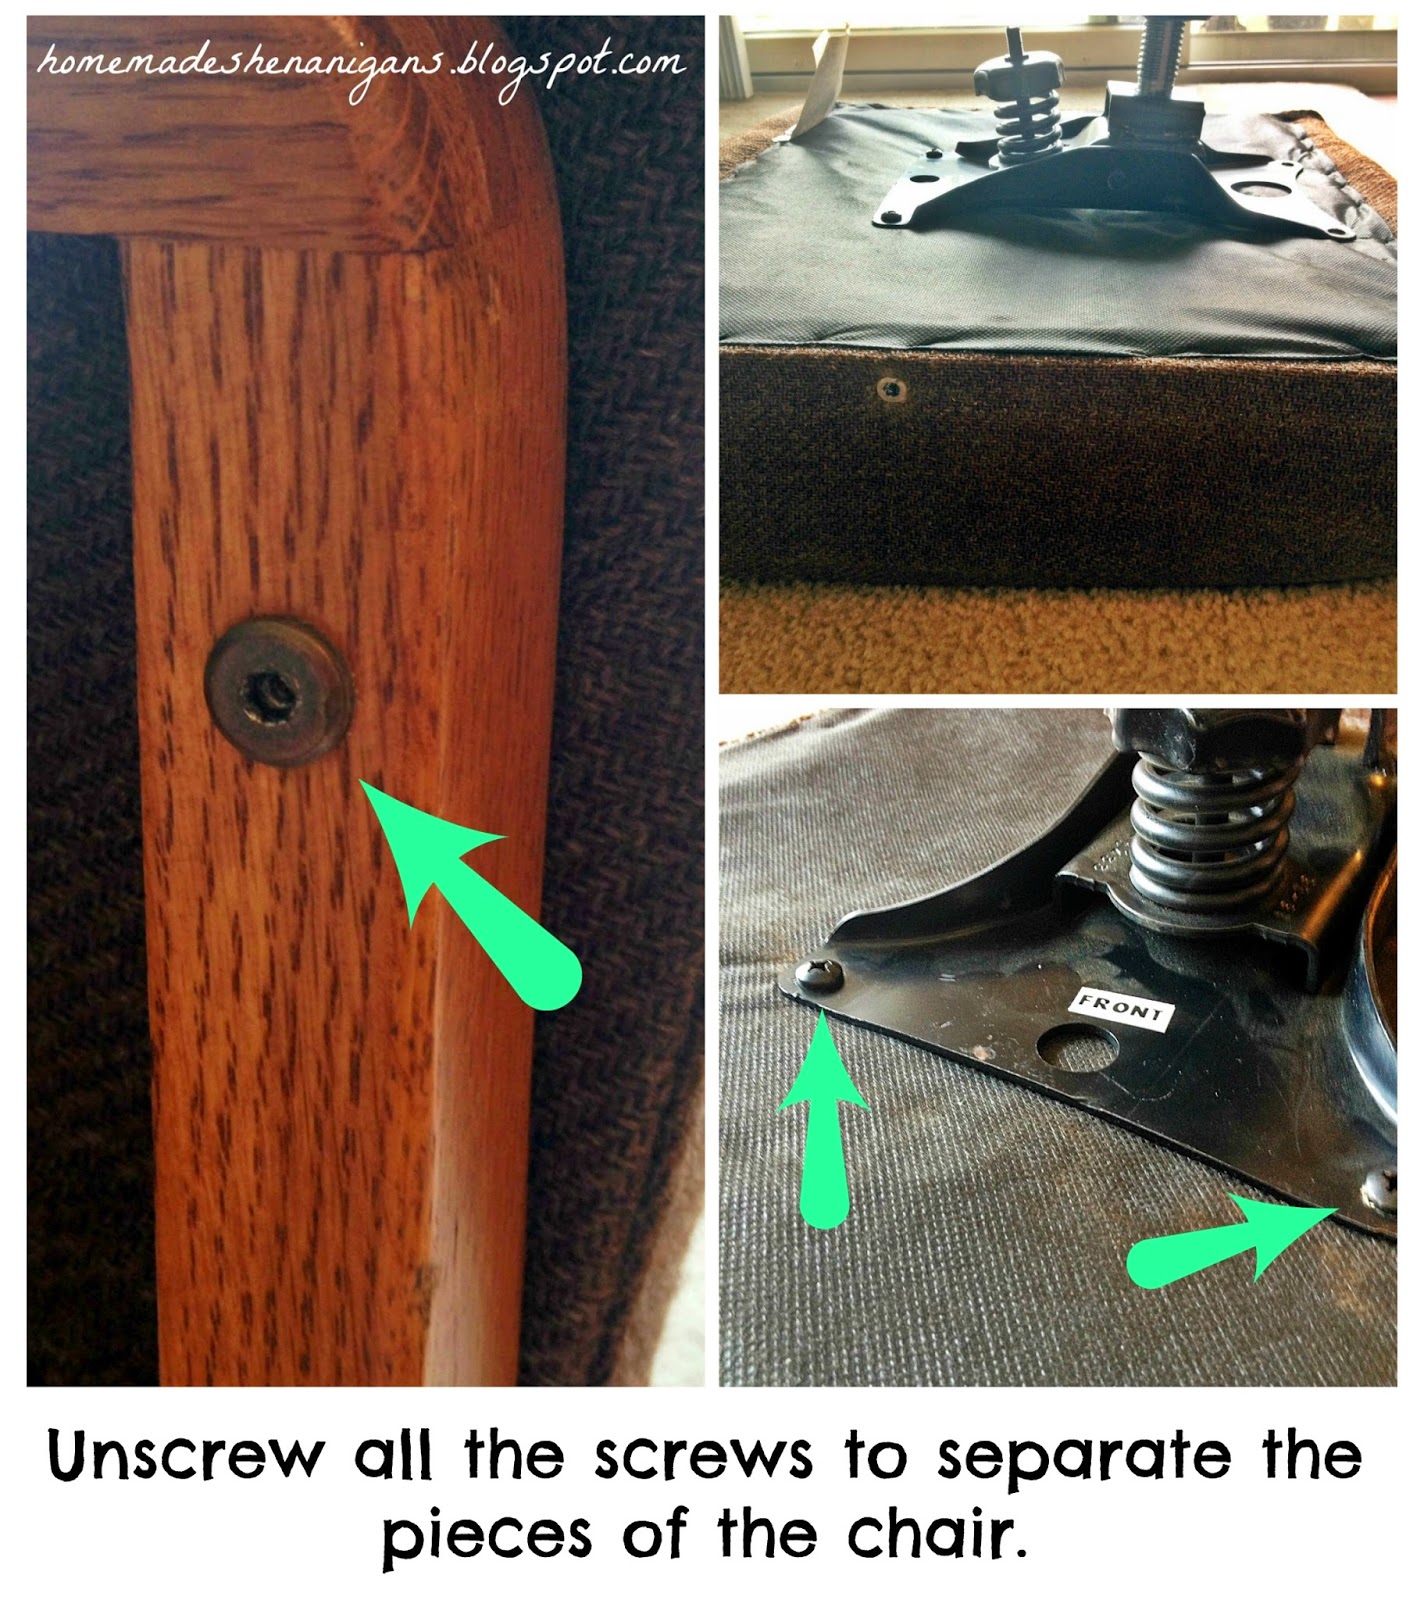
  2. Take the fabric off of the chair by pulling all of the staples out. Use a seam ripper to detach the pieces from each other. These will be used as the pattern pieces for the new fabric.
  3. The back of this chair had a nail strip attaching the fabric to the back so be careful and remove this part and set aside.
  4. Lay out the fabric and use old fabric as pattern pieces. The black fabric will be on the sides and the Marvel fabric will be the main portion of each cushion. Cut out your fabric.
  5. Next, place the fabric on the cushions right side down.
  6. Pin the pieces together so that you form a new cover for each cushion. You want it to be somewhat tight so that the fabric will be taut once it is all stapled down.
  7. Remove new fabric cover from cushion and sew along where you have pined it.
  8. Flip inside out and place over cushion. Pull fabric taut and staple to the wood underneath. You will be reattaching everything like it was when you took the old fabric off the chair originally.
  9. The next part that needs to be done is painting the wood parts. I decided to use chalk paint so that I would not have to sand everything before-hand. Mix 1/3 cup plaster of Paris, 1/3 cup water, and 1 cup paint. Paint all surfaces and let dry in-between coats. I ended up doing three coats to make sure everything was covered.
  10. Once it is dry, cover with a coat of polyurethane. I did not use wax because I wanted it to have more of a shine and have a smoother finish. I only did one coat but you can do several if you want more protection.
  11. When everything is done drying you can reattach the cushions and start using your brand-new, one of a kind chair!

I love how it looks in my boyfriend's office and he has already been sitting in it. It is much better than a folding chair and fits his personality perfectly! What kinds of personalized items have you made recently? Hope you enjoy and let me know what you all think!

Monday, June 16, 2014

DIY Bar Stool

For the past two years, ever since I moved to Indianapolis, I have been wanting bar stools for my kitchen. I looked all over the internet and at pretty much every store in the area and all I could find were overpriced generic stools. I wanted something fun, unique and sturdy. Eventually I found a plan for these vintage bar stools on Ana White's website. I immediately new those were what I wanted to make. 


Many of my friends and family thought I was crazy in thinking I could make my own bar stools but I was determined. I got out my kreg jig and got to work. Lowe's cut all of the wood for me, since I did not have a saw yet, and all the measurements turned out perfect!


After building the bar stool I painted it with some teal paint. I used the chalk paint recipe: 1/3 cup plaster of Paris, 1/3 cup water, 1 cup paint. I lightly distressed it with some sand paper and sealed it with some wax. Overall, I love how it turned out and it looks great at the counter. The color matches perfectly with the bookcase I have in my living room and now I have a nice place to eat my breakfast every morning when I get home from work! :)


I am still shocked at how well this turned out. If I can do this anyone can! Let me know what you think!

Monday, April 28, 2014

Dining Room Shelves

This was my first attempt at woodworking. I have refinished furniture but I had never actually tried to make my own. I had been reading Ana's website for a while now and finally got the courage to go buy a kreg jig and get to work. I chose this project because of the small amount of lumber needed and the simplicity of the plan. I figured if this one turned out OK then I could move on to bigger, badder projects.


Supplies:

  • (1) 1x2x8 pine board
  • (2) 1x4x8 pine board
  • Mini Wax Gunstock stain
  • Rustoleum Dark Walnut stain
  • Sandpaper
  • Scrap rags
  • Paintbrush
  • Mini Wax Semi-gloss polyurethane
I followed Ana's plans here and watched her video to make sure I did it right. This was the first time I had used the kreg jig and I wanted to make sure I did it right. One thing I found was that you need to make sure you check the washer on your drill bit frequently with the kreg jig. Mine came loose and I didn't realize it. I almost tried drilling a hole through my kreg jig base!


When I went to go buy stain I found the color I wanted on the sample board but the store did not have it in stock. I called my mom (because that is what I do when I get stumped) to ask her for advice on what to do. I did not want to paint my shelves white because I felt it would blend in too much. White shelves on a white wall with white decorations seemed a little much. Her suggestion was to mix one of the stains I already had at home with a lighter one from the store. I thought that was crazy but it actually ended up working. The stain looks great. Not too red but not too grey either. A perfect mix of both stains.

The way I did the stain took a couple of steps.
  1. First, sand your shelf to make it smooth. Wipe off all the dust.
  2. Next, wipe on the dark walnut stain and let it sit for a few minutes. Remove access stain.
  3. Then, wipe on the gustock stain over the walnut stain. Let sit for a few minutes and then remove access.
  4. Once the shelf has dried for a few hours you can apply the polyurethane. I did two coats. Make sure to lightly sand in between coats so that you get a nice even layer.

After hanging my shelves I decorated with those superhero plates and placed my DIY artwork on either side. I am so excited with how these shelves turned out. I already have a list of projects I want to tackle next!


Saturday, April 26, 2014

Dining Room Makeover

Ever since moving into my new apartment I have had a vision of what it would look like. I wanted something light, airy, and full of fun bright colors. I wanted a cute little cottage feel. Slowly, I have been adding little touches here and there. For my dining room I knew I wanted somewhere to display the superhero plates I had made for my boyfriend, some large pieces of artwork, and a nice table.


After scouring craigslist, I found the perfect French provincial table and chairs. It was the perfect size for my small dinning room and after changing the fabric it was almost perfect. I still need to refinish the table top since there are some water stains and scratches on it but that will be a project for warmer weather. The next thing I did was look for artwork. Everything I found was either not to my liking or WAY too expensive. After searching through Pinterest I found some good inspiration and made my own. I will be blogging about that project later this week so make sure to keep an eye out! The last step was to find some kind of storage. After searching for a while I realized there was nothing out there I really liked. Recently, I found Ana White's website and all her amazing building plans. I think she is super inspiring and after reading her "about me" section I picked a building plan, bought a kreg jig and some wood, and got to building my very own shelves. I am so excited with how they turned out and cannot wait to try my next project!

BEFORE:


AFTER:


I think that everything came together very nicely. I love when a room finally looks put together. Even though I have been in this apartment for almost 6 months it was still looking like I had just moved in. My boyfriend had been hinting he was about to start hanging his own artwork if I didn't do it soon which definitely lit a fire under my butt to get it done. While I love the artwork he has, I think an entire apartment covered in superheros would be a little much! Hope my dining room transformation inspires you all to start your own home improvement projects!


Wednesday, March 26, 2014

Credenza Makeover

This week I was able to get some time off work to go visit my family. My sister has been taking singing lessons and landed her first part in her middle schools musical. She was very excited so I knew I needed to go see her perform. Since I had a couple days off, I was able to spend a few days with the family and had some good quality time with all of them. I even got to go see Divergent with my sister and we were both very happy with it. 


Since I had a couple of days I decided to tackle the credenza I talked about in one of my earliest posts. This massive piece of furniture was a huge eyesore but still a very functional piece. It was too heavy to move and provided valuable storage space for all of my mom's work files. My solution was to paint it with chalk paint and decorate the top to help it blend in more with the rest of the room. 


Before the makeover, this credenza did not fit with the decor at all and was just a catch-all for random items.

Supplies:
  • Paint (I used Valspar Signiture paint & primer in one in the color "cake batter")
  • Plaster of Paris
  • Water
  • Wood wax
  • Cloths
  • Paint brush
  • Painters tape
  • Razor

Directions:
  1. First thing I did was put drop cloths around my entire project. I also covered the pool table since it was near where I was going to be painting. I then taped off all of the metal on the credenza that I did not want paint to get on. Remove all of the drawers and set those evenly spaced on a tarp.
  2. Next, I mixed 1/3 cup plaster of paris with 1/3 cup water and mixed until there were no lumps. After the mixture is smooth, add 1 cup paint and mix again. 
  3. Take that mixture and paint your piece of furniture. Go with the grain of the wood and coat evenly. This project took three coats of paint to get the finish I wanted. I did not wait very long in between coats. By the time I got everything painted with one coat I just started back over at the beginning for the second coat.
  4. Let the paint dry overnight. Remove the painters tape and use the razor to remove any paint that got onto the metal.
  5. Next step is to coat the entire thing with the wax. I used some plain scrap cotton cloths to apply the wax. I think I will buy an actual wax brush for my next project though since the cloths get pretty torn up in the process. You will use three or more depending on the size of your piece.
  6. Let the wax dry a few hours.
  7. Decorate and you are finished!


After painting the credenza, me and my mom went shopping for some decorative pieces to tie everything together. My mom wanted the room to have an elegant yet still masculine feel. Many of the items we found at Hobby Lobby. Many of the smaller pieces where items that had been in storage for a while but had special meaning to my parents. They had put many of these things away while me and my siblings were younger to prevent them from getting broken. Now they get their chance to be out in the open again!

This box is the perfect size to hold all of the accessories my dad uses for the pool table.

The picture on the right was a gift from my sisters soccer team to my dad to say thank you for being the coach. It deserved a prominent spot to be displayed.

The mice in the love boat is actually a music box that my dad gave to my mom when they first started dating. She has an entire collection of these but this one was my favorite.


I was really happy with how the credenza turned out and so was my family. There are still a few more things I would like to do to the room but it is definitely coming along nicely!

Friday, February 21, 2014

Miniature Sewing Chest

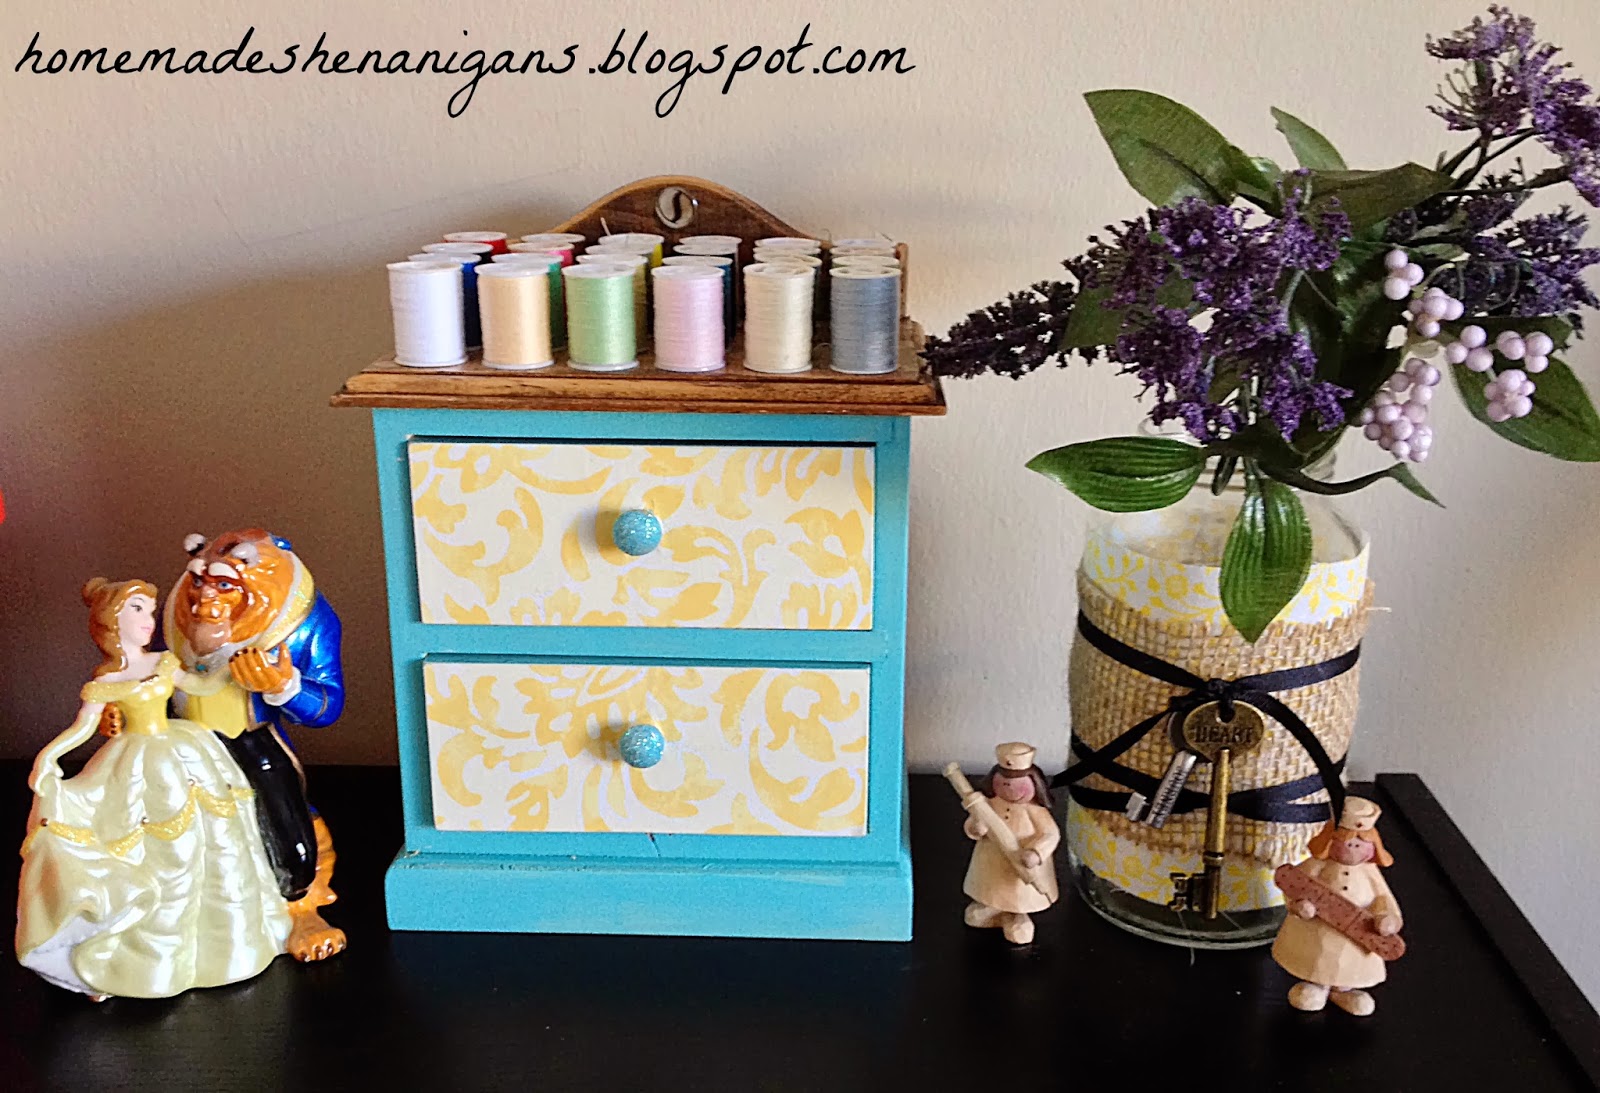
For the past couple of days I have been slowly transforming my guest bedroom into a craft room. I have always wanted a designated area to work on things and decided that keeping the room primarily as a guest bedroom just wasn't practical for my needs. I have an area for my sewing machine and a bookcase that has all of my sewing items. A couple of months ago I found a miniature sewing chest at Hancock Fabrics on clearance for $5.00. The sewing chest was unfinished wood and came with many supplies such as scissors, needles, and pins. Today I finally took the time to finish it and I am extremely happy with how it turned out!


I wanted to use some fun colors since it was a small item. I already had everything on hand so this project only cost as much as what I paid for the actual sewing chest.

Before!
Supplies:
  • Sewing chest
  • Paint
  • Stain
  • Water
  • Plaster of Paris
  • Finishing wax
  • Scrapbook paper
  • Mod Podge
  • Glue
  • Glitter
  • Scissors
  • Sandpaper
Directions:
  1. First, I stained the top of the sewing chest. This process was a bit difficult due to the rods that hold the spools of thread. I also had to sand it a bit first to get the stain to adhere better (The top was very smooth and had some kind of clear finish on it).
  2. Secondly, I mixed up my paint. I decided to use homemade chalk paint for this project since it worked well for my Microwave Cart Makeover. The recipe I used was 3 parts paint, 1 part Plaster of Paris, and 1 part water. You can add more or less water to get the consistency you want. I first mix up the water and Plaster of Paris to get a nice paste and then add the paint. Make sure it is smooth before applying to your project. 
  3. Remove the drawers from the chest and paint all the surfaces except the fronts and insides of the drawers. I decided to paint the sides of the drawers because they kind of stick out a little from the chest when inserted so you would be able to see unfinished wood if I hadn't.
  4. Let dry and apply additional coats if necessary. I did two coats total. 
  5. Once your painted surface is completely dry, take a rag and apply the finishing wax over the entire surface. This helps protect and seal your paint job.
  6. Next step is the front of the drawers. I cut out two pieces of scrapbook paper (this does not have to be perfect. Just make sure the pieces are slightly bigger than the fronts of the drawers). I then cut a hole in the center where the knobs went and slid the paper of the knobs (The knobs were glued on otherwise I would have removed them to make this process easier).
  7. Use your Mod Podge to glue the scrapbook paper to the fronts of the drawers. Smooth out any wrinkles or bubbles and let dry. 
    Paper on drawer fronts before sanding.
  8. Next, take your sandpaper and sand the edges of the drawers where the scrapbook paper sticks out from the edge. This will help you get a clean line from the scrapbook paper that matches perfectly with the edges of the drawer fronts.
  9. Seal the paper with Mod Podge and let dry.
  10. Once it is completely dry, coat the knobs in a thin layer of Mod Podge and sprinkle glitter onto them. You want to make sure the drawers are completely dry so that the glitter will only stick to the knobs and not the entire drawer.
  11. Let dry and you're done!


I think it looks perfect in its spot with all my sewing supplies. It is the perfect size for on top of the bookcase. Next to it I keep a basket with my sewing scissors and sewing patterns for quick access. Early next week I am going to do a post on how to do that mason jar vase so keep a look out!

Also, I just linked my Banana Muffins to the What We Eat Wednesday linky party hosted by Laugh. Eat. Learn. and Orchard Girls. They both have some pretty awesome recipes that I am just dying to try. Go check it out!

Laugh. Eat. Learn.

Saturday, February 1, 2014

Oak Dresser Redo


A couple of summers ago when I was planning on moving into my own place, I realized that I needed a new dresser for my bedroom. I started looking on craigslist and I found a simple three drawer oak dresser listed for $30. It was exactly what I had been looking for, it was close by, and it was the right price. I had to have it. After seeing it, I knew it was going to be a lot of work but I was in love. I also ended up only paying $25 for it which was a steal. There was a chip out of the bottom corner on one of the drawers and a few water stains on the top but otherwise it was in good shape. I took it home and began work on it.


The dresser before beginning any work on it. At first look, it almost looks like a weird orange stain but it was actually multiple layers of paint.
Dresser without the drawers. You can see how dusty and dirty it was beforehand.
In the middle of my work, after hours of sanding, a storm came through very suddenly. It came on so quick I did not have time to get the dresser back inside and the entire thing got blown through the yard. You can imagine my disappointment. I was convinced it was ruined but luckily I did not find one dent on it. The only problem I had was the back of the dresser has a thin sheet of particle board on the back and it became a little warped. Good thing I decided on a sturdy, all wood dresser!

After getting it sanded I took some dark walnut stain and stained the dresser. I then took some polyurethane and put two coats of it on the outside to seal it. For the knobs, I took inspiration from Kmadson's Etsy shop. I made the knobs by designing the ads on a computer program I have and then printed them out onto paper. I cut them out and mod podged them onto the original knobs that came with the dresser. I also painted the original knobs black before putting the ads on them. I decided I wanted them to be extra special so I hid special dates such as when I took the NCLEX for nursing within the "vintage ads" on my knobs.

Supplies:
  • Dresser - $25.00
  • Paint stripper - $15.00
  • Stain - $5.00
  • Polyurethane - Free
  • Sander - Free
  • Sand Paper - $5.00
  • Face mask for sanding - $5.00
  • Eye protection for sanding - Free
  • Rags for staining - Free
  • Paint brush for polyurethane - Free
  • Knobs - Free
  • Paper - Free
  • Mod Podge - Free
  • Black Paint - Free
Total Cost: $55.00


I am really happy with the final project and overall it has held up really well. Most of the supplies I used I already had which made it fairly inexpensive. Also, It survived a massive storm and two moves... I'd say that's a pretty sturdy dresser worth every penny!


Wednesday, January 8, 2014

Microwave Cart Makeover

I have been wanting to try out chalk paint for quite a while now and after visiting my parents for the holiday I found the perfect opportunity. My mom had been wanting to redo a large credenza she had in the family room (now converted billiards room) but did not know how it would be possible since it was too heavy to move outside and sand. Chalk paint presented the perfect option since no sanding is required. We would not have to worry about getting dust throughout the house and wouldn't have to come up with a means of getting it outside. Since I had never used chalk paint before I decided to try it on a smaller piece of furniture, a microwave cart. This had been laying around the house collecting dust and was in desperate need of a makeover. 

I forgot to take a picture before I started setting everything up. I had already removed the doors for easier painting and had placed a flexible work light so I could see where I was painting.

This is what the doors looked like before with the original handles. This is the back of the door with the handle just sitting on top so the black hardware won't be visible when the doors are reattached.

Now anyone who knows me knows that I like completing my projects in the easiest and cheapest way possible while still getting professional results. You may even say I am a bit of a penny pincher. So while there are some chalk paint distributors close to where I live, I was not liking the prices nor the limited choices on colors. I decided to do some research online and found a good recipe for homemade chalk paint. I found the blog How to Distress Furniture which compared three different chalk paint recipes. I thought they did a wonderful job showing the differences between the various types. The one I went with used Plaster of Paris: 

  • 1 cup latex paint 
  • 2 1/2 Tbls Plaster of Paris 
  • 1 1/2 Tbls cool water


I did not want to use my measuring tools that I use for food so I just estimated amounts which worked pretty well for me. The paint mixed up really well and went on smoothly. One 10 oz sample size of paint from Lowe's was enough to do three coats. I let the paint dry overnight and then applied a coat of Minwax finishing wax. After a new set of handles the microwave cart looked brand new. It was a drastic improvement and will fit perfectly in my mom's home office for additional storage space.

I decided to use a brighter color since it was a smaller piece of furniture. There is also some distressing on the edges that are difficult to see in this picture. I am hoping to add some baskets or bins in the open space for organizing papers.

Materials:

  • Microwave cart: Free
  • 4 lb box Plaster of Paris: $6.50
  • 4 oz sample paint: $4.00
  • 2 bronze handles: $8.00
  • Minwax Finishing Wax: $9.00
  • Paint brush: Free
  • Scrap rags (for applying wax): Free
  • Water: Free


Total: $27.50


Overall, I love how the cart turned out. This makeover cost less than $30 which is a steal, especially since almost all of the items can be reused. I barely touched the Plaster of Paris and Minwax finishing wax. I cannot wait to paint more things with this paint recipe. Next up will be that credenza!