Sunday, July 13, 2014

Strawberry Banana Smoothie

One thing I really love about summers is the abundance of fresh fruit. There are so many choices and I have been wanting to find more ways of incorporating them into my diet. Here is a delicious smoothie that is easy to make and full of good nutrition!


Ingredients:

  • 1 banana
  • 1/2 cup strawberries
  • 1/4 cup spinach
  • dash of nutmeg
  • 6 Tbls water
  • 6 Tbls unsweetened almond milk
  • 2 Tbls sugar
Directions:
  1. Pour all ingredients into a blender and blend until smooth and fully combined.

This recipe is simple to make and is the perfect size for one person. I have one of the original NutriBullets which allows me to blend and drink from the same cup. I plan on making many more smoothies this summer and this one was definite hit.


What other smoothies have you all made? What kinds of ingredients do you like to add to yours? Let me know what you think!


Tuesday, July 8, 2014

Superhero Desk Chair

My boyfriend has a serious obsession with superheros and Marvel comics is displayed everywhere in his office. Artwork he finds at comic cons line the walls and he has a fairly large collection of superhero figurines. One of his degrees is in film and he proudly shows this anywhere he can.


One thing his office was lacking was a nice office chair. I debated getting him a big leather one but when I had the opportunity to inherit an old office chair from my Granny's house I took it and decided to give him something more unique. Here is how I did it:

Supplies:
  • Office chair of choice
  • 3 yards Marvel fabric
  • 1 yard black fabric
  • Staple gun
  • Sewing machine
  • Seam ripper
  • Staple remover
  • Pliers
  • Screwdriver
  • Black paint
  • Polyurethane
  • Plaster of Paris
Directions:
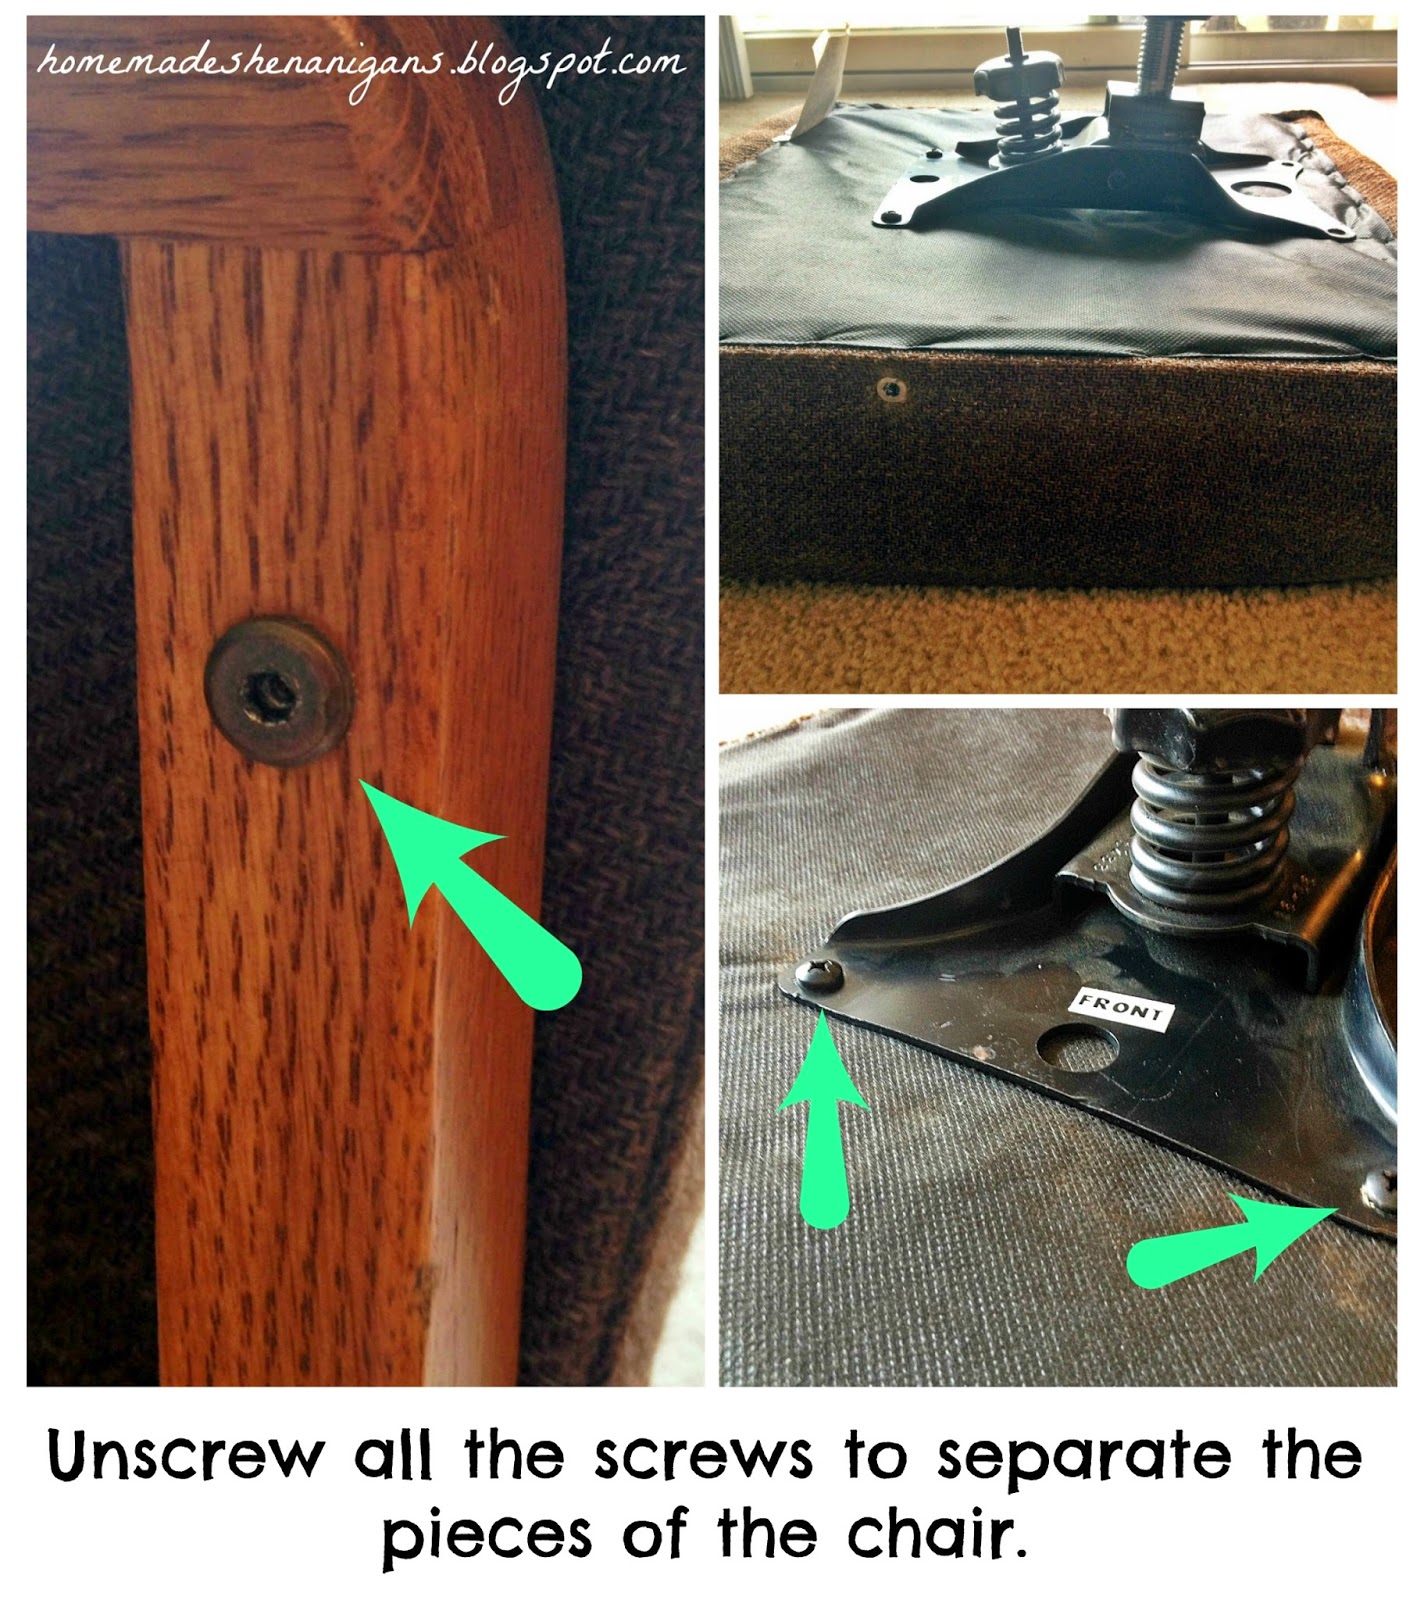
  1. First, you will need to disassemble the chair. Unscrew the arms and set aside. Also, unscrew the bottom rolling portion. You should now have two separate cushions (the back portion and the part you sit on).
  2. Take the fabric off of the chair by pulling all of the staples out. Use a seam ripper to detach the pieces from each other. These will be used as the pattern pieces for the new fabric.
  3. The back of this chair had a nail strip attaching the fabric to the back so be careful and remove this part and set aside.
  4. Lay out the fabric and use old fabric as pattern pieces. The black fabric will be on the sides and the Marvel fabric will be the main portion of each cushion. Cut out your fabric.
  5. Next, place the fabric on the cushions right side down.
  6. Pin the pieces together so that you form a new cover for each cushion. You want it to be somewhat tight so that the fabric will be taut once it is all stapled down.
  7. Remove new fabric cover from cushion and sew along where you have pined it.
  8. Flip inside out and place over cushion. Pull fabric taut and staple to the wood underneath. You will be reattaching everything like it was when you took the old fabric off the chair originally.
  9. The next part that needs to be done is painting the wood parts. I decided to use chalk paint so that I would not have to sand everything before-hand. Mix 1/3 cup plaster of Paris, 1/3 cup water, and 1 cup paint. Paint all surfaces and let dry in-between coats. I ended up doing three coats to make sure everything was covered.
  10. Once it is dry, cover with a coat of polyurethane. I did not use wax because I wanted it to have more of a shine and have a smoother finish. I only did one coat but you can do several if you want more protection.
  11. When everything is done drying you can reattach the cushions and start using your brand-new, one of a kind chair!

I love how it looks in my boyfriend's office and he has already been sitting in it. It is much better than a folding chair and fits his personality perfectly! What kinds of personalized items have you made recently? Hope you enjoy and let me know what you all think!

Saturday, July 5, 2014

Dairy Free Ranch DIp

A veggie tray with ranch dip is a staple dish at any get together. One problem with ranch dip though is that it is full of lactose. At my future sister-in-laws bridal shower I made some homemade ranch dip that did not include any dairy. Here are the instructions so that you can make your own!


Ingredients:
  • 1 cup Follow Your Heart dairy free sour cream
  • 1/2 cup mayonnaise
  • 1 Tbls fresh chives
  • 1 tsp dried parsley
  • 1 tsp dried dill weed
  • 1 tsp garlic powder
  • 1 tsp onion powder
  • 1/4 tsp ground black pepper
  • 1/2 tsp salt
Directions:
  1. Combine all ingredients in a small bowl.
  2. Serve with vegetables.

This is super simple and no one at the party believed it was dairy free. That to me is a success. For the vegetable tray, I used cherry tomatoes, baby carrots, celery, yellow peppers and broccoli. It was a nice colorful and healthy addition to the table. Nothing was left of it by the end of the night. Hope you all enjoy!

Tuesday, July 1, 2014

Slow Cooker Pulled Pork Sandwiches

This was another recipe that we had at the bridal shower I recently planned. It is super easy to make and is a delicious option to have at your next get together!


Ingredients:

  • 2 1/2 lbs pork roast
  • 1 - 14 oz bottle of Sweet Baby Ray's BBQ sauce
  • 1 tsp brown sugar
  • 1/2 tsp pepper
  • 1/2 tsp cumin
  • 1/2 tsp paprika
  • 1/2 tsp garlic
  • 1/2 tsp onion powder
  • Slider buns
Directions:
  1. Place pork roast in slow cooker and cook on low 10-12 hours (or on high 5-6 hrs).
  2. Remove pork roast from slow cooker and shred the meat. 
  3. Pour liquid out of slow cooker and place shredded pork roast back into the cooker.
  4. Mix in remaining ingredients and cook on high for 2 hours.
  5. Serve on buns.

This recipe came from my mom and she cooked and shredded the pork roast the night before. We finished up the prep work and the remaining 2 hours of cooking the morning of the bridal shower. This recipe is super simple and was as big hit at the party. Hope you enjoy!

Saturday, June 21, 2014

Cheesy Chicken Alfredo Pasta - Dairy Free

Lately I have been wanting some delicious Alfredo pasta. I whipped this together after getting some inspiration from Desert Now Dinner Later and Mel's Kitchen Cafe. Combining these two recipes, adding some of my own flavors, and converting it to dairy free resulted in a very satisfying dinner.
This was easy to prep and there was a lot leftover for me to eat later in the week. Yum :). This would probably even make a good freezer meal for those who like to plan ahead. So grab your apron and lets get cooking!


Ingredients Alfredo Sauce (makes about 2 cups):
  • 2 Tbls dairy free butter
  • 2 tsp minced garlic
  • 4 oz GoVeggie cream cheese
  • 1 cup almond milk
  • 1/2 cup GoVeggie Parmesan cheese
  • 1/2 tsp ground black pepper
  • 1/2 tsp salt
  • 1/4 tsp nutmeg
  • 2 Tbls flour
Ingredients Pasta:
  • 8 oz box pasta
  • 2 1/2 cups broccoli
  • 2 cups shredded chicken
  • 1 1/2 cups shredded GoVeggie Cheddar cheese
  • 1/4 tsp pepper
  • 1/2 tsp garlic powder
Directions:
  1. Set oven to 350 degrees F.
  2. Fill medium sauce pan with water and bring to a boil. Cook pasta as directed on box. Usually around 7-9 minutes.
  3. In separate sauce pan or skillet melt butter over medium heat. Add minced garlic and cook for 2-3 minutes stirring constantly.
  4. Add in the cream cheese and whisk until smooth and creamy.
  5. Slowly pour in almond milk, continuing to stir. 
  6. Add flour and Parmesan cheese, stirring until thickened.
  7. Stir in pepper, salt, and nutmeg. Remove from heat and set aside.
  8. Steam broccoli either in microwave or on the stove top. 
  9. Combine Pasta, Alfredo sauce and brocolli. Season with pepper and garlic powder.
  10. Pour pasta mixture into 9x13 foil lined pan and top with shredded cheese.
  11. Bake for 20 minutes or until bubbly and heated in center.


This recipe is more on the drier side so if you like your pasta very creamy double the Alfredo sauce. Me and my boyfriend loved this recipe and I will be making it again soon. It took me about 20 minutes of prep and I paired it with some simple homemade garlic bread. It was a perfect meal for a nice summer evening. Hope you enjoy!

Monday, June 16, 2014

DIY Bar Stool

For the past two years, ever since I moved to Indianapolis, I have been wanting bar stools for my kitchen. I looked all over the internet and at pretty much every store in the area and all I could find were overpriced generic stools. I wanted something fun, unique and sturdy. Eventually I found a plan for these vintage bar stools on Ana White's website. I immediately new those were what I wanted to make. 


Many of my friends and family thought I was crazy in thinking I could make my own bar stools but I was determined. I got out my kreg jig and got to work. Lowe's cut all of the wood for me, since I did not have a saw yet, and all the measurements turned out perfect!


After building the bar stool I painted it with some teal paint. I used the chalk paint recipe: 1/3 cup plaster of Paris, 1/3 cup water, 1 cup paint. I lightly distressed it with some sand paper and sealed it with some wax. Overall, I love how it turned out and it looks great at the counter. The color matches perfectly with the bookcase I have in my living room and now I have a nice place to eat my breakfast every morning when I get home from work! :)


I am still shocked at how well this turned out. If I can do this anyone can! Let me know what you think!

Friday, June 13, 2014

Wreath Embellishment

As I had mentioned in an earlier post my future sister-in law's bridal shower for my side of the family was this weekend. Early this year I had made this Spring Rose Wreath for my door. Amy had really liked it and wanted me to make one for her. The pink in it matched perfectly with her wedding colors and I thought it would be wonderful to use this as decoration for the bridal shower, especially since I knew she already liked it. Most of the bridal shower was a surprise. I did not want her to worry about any of the details so I made sure to keep all of the planning on the DL. 


Lots of people were coming from out of town and had not been to my parents house in a while so I decided the wreath would be perfect as a welcome decoration on the front door. All it needed was some embellishment! That's when I came up with this simple project to update the wreath.

Supplies:


  • Round piece of wood (I found this at Hobby Lobby near all the wooden letters)
  • White paint
  • Pink paint
  • Paint brush
  • Letter stamps
  • Tape
  • Hot glue
  • Ribbon
Directions:
  1. Paint wooden circle with white paint and let dry.
  2. Paint each letter stamp and stamp phrase onto wooden circle.
  3. Attach ribbon to back of wooden circle with hot glue gun. To finish, tie around or hot glue to top of wreath.

I love how it turned out and it was the perfect decoration for the front door to welcome everyone to the party. This project was quick and simple making it the perfect project for any party! Hope you all enjoyed!